After creating "The Open Window" with AI, I needed a hero video for SpecStory. This time, instead of traditional video editing, I built it programmatically with Remotion and Claude Code in just 2 hours. This is a very detailed step-by-step of how I had a conversation and produced a product video that would have otherwise been nearly impossible for me. I hope it inspires you to try your hand!🚀 Get the complete source code and chat historygithub.com/specstoryai/zero-to-product-video-hero
The Initial Vision
Unlike traditional video editing, I built this programmatically with Remotion and Claude Code in just 2 hours. But the original plan was different. Here's what plan.md outlined:
## Total Duration: 35 seconds

### Scene 0: Medieval Monk Video (0-5 seconds)
**Visual:** Existing medieval monk video with text overlays
**Text Overlays:**
- "We've always preserved our intent" (1-3s)
- "Now, let AI preserve yours" (3-5s)
**Transition:** Fade to black with time warp effect

### Scene 1: Time Transition (5-7 seconds)
**Visual:** Swirling time vortex effect morphing medieval to modern
**Audio:** Whoosh/time travel sound effect
**Purpose:** Bridge the gap between past and present

### Scene 2: Modern Developer (7-11 seconds)
**Visual:** Developer coding with AI assistance, prompts floating away
**Text Overlay:** "But your AI prompts vanish..."
**Animation:** Show prompts detaching from code, floating into void
**Purpose:** Establish the problem

### Scene 3: Intent is the New Source Code (11-13 seconds)
**Visual:** Split screen - monk writing / developer coding
**Main Text:** "Intent is the new source code"
**Subtext:** "From medieval scribes to modern developers"
**Purpose:** Core message delivery

### Scene 4: SpecStory Solution (13-23 seconds)
**Visual:** Product demo showing extension in action
**Animation Sequence:**
1. Extension icon magnetically pulls prompts back (13-15s)
2. Prompts attach to code like puzzle pieces (15-17s)
3. Timeline shows prompt evolution (17-19s)
4. Team avatars appear, sharing context (19-21s)
5. Quick text overlays: "Auto-saves every prompt" • "Preserves your why" • "Share intent with your team" (21-23s)

### Scene 5: Call to Action (23-35 seconds)
**Visual:** Three extension logos orbiting central text
**Main Text:** "Get SpecStory Extensions"
**Subtext:** "Never lose your intent again"
**Counter:** Install counter ticking up
**End Card:** specstory.com
What actually happened was both simpler and more complex. Simpler because ambitious animations like "swirling time vortex effect" became a 4-second MP4 file. More complex because it did take 191 exchanges with Claude Code to discover what the video wanted to be.
As I look back and analyze my SpecStory (which I exported to help me write this recap) I noticed a lot of patterns. Here's a taste of what I detail in the feedback loop section:
- "bigger logo" - said three times for the same logo until it was finally right
- "sorry it should count up from 90%" - the immediate correction that made the stats feel more authentic
- "a little" - appeared over 8 times, showing how progress happens in small nudges
Each piece of feedback shaped what came next. When I said "the zoom should be a little longer and not zoom back out," I was discovering what felt right through iteration.
The Timeline
Unlike my 10-hour journey with "The Open Window," this project was a focused sprint. The commit messages might not win any awards for clarity, but they capture the energy of the session - pure creative flow powered by Remotion.dev and a HEALTHY amount of yapping with Claude Code.
Git Commit Timeline
The Technology Stack
Unlike traditional video editing, this project combined programmatic animation with AI-generated assets:


And about that music: Paganini's Violin Concerto No.2 in B minor. The dramatic violin perfectly matches the journey from medieval to modern, adding emotional weight to the technological transformation.
What is Remotion.dev?
Before we dive into the development process, let's talk about the magic that made this possible. Remotion is not your typical video editor - it's React for videos. Yes, you read that right. Videos built with React components.
Think of it this way: traditional video editing is like painting - you manipulate pixels on a timeline. Remotion is like programming - you write code that generates frames. Each frame is just a React component rendered at a specific point in time.
Here's how my SpecStory video maps to Remotion's core concepts:
// HeroVideo.tsx - The composition definition
<Composition
  id="HeroVideo"
  component={HeroAnimation}
  durationInFrames={1170}  // 39 seconds at 30fps
  fps={30}
  width={1920}
  height={1080}
/>
Those 1170 frames? Remotion rendered my React component 1170 times, incrementing the frame count each time. The genius is in how you use that frame count:
// Inside any component
const frame = useCurrentFrame();
const opacity = interpolate(frame, [0, 30], [0, 1]);

// Frame 0: opacity = 0 (invisible)
// Frame 15: opacity = 0.5 (half visible)
// Frame 30: opacity = 1 (fully visible)
This is the fundamental shift: instead of keyframes and timelines, you have math and logic. Want something to fade in? Interpolate. Want complex sequences? Use conditional rendering based on frame ranges. Want to loop something? Modulo arithmetic.
My 39-second video was really just five React components (VideoIntro, TimeTransition, ModernDeveloper, IntentOverlay, BenefitsAndLogos) rendered in sequence, each knowing exactly when to appear and disappear based on the current frame number.
The beauty? Everything that works in React works here. CSS-in-JS, component composition, hooks, even npm packages. That VS Code interface in scene 3? It's just divs and CSS. The animated stats counter? A custom hook that increments based on frame progression.
This is why building a video in 2 hours was possible - I wasn't learning video editing software, I was writing React. And Claude Code? It already knows React.
But here's what really makes Remotion special: it's not just about generating graphics. You can drop in real videos and audio files just like any other React asset. Remember that time tunnel transition? That was a 4-second MP4 file from Google Veo 3:
// Scene 2 - TimeTransition.tsx
<Video
  src={staticFile('time tunnel.mp4')}
  startFrom={60}  // Start 2 seconds into the video
  endAt={180}     // End at 6 seconds (4 seconds total)
/>
The medieval monk? An animated mp4 from Midjourney. The VS Code interface? Pure React components. Paganini's violin concerto? An MP3 file. Remotion doesn't care - it composites everything together, frame by frame.
This hybrid approach is the secret sauce. You get the precision of code for UI elements (perfect for product demos) combined with the richness of pre-rendered media (great for artistic elements). Traditional video editors make you choose between programmatic control or rich media. Remotion gives you both.
In my case, I used AI to generate the artistic assets (Midjourney for characters, Veo 3 for transitions), then used code to choreograph everything with pixel-perfect timing. The result? A video that looks professionally edited but was built like a web app.
The Development Process
If you've never seen Remotion's dev environment, it looks like a lot of other video editors. But under the hood, it's fundamentally different - you're not manipulating a timeline, you're writing React components that render video frames.

That's React DevTools... debugging a video. Each component render is a frame. Change a prop, the video updates. Add a console.log, watch it fire 30 times per second. This is what makes Remotion special:
- Parametric videos - Pass data to your video like props to a component. Want to generate 1000 personalized videos? Just map over your data.
- Real MP4 output - Not a screen recording or browser capture. Actual video files rendered frame-by-frame at any resolution.
- Hot reload everything - Change code, see video update instantly. No rendering queue, no waiting. It's like developing a website but for video.
- Full React ecosystem - Use any npm package, CSS-in-JS, hooks, context, even Redux if you're into that. If it works in React, it works in your video.
- Deterministic rendering - Frame 420 always looks the same. No timing issues, no async weirdness. Perfect for version control and collaboration.
The workflow becomes addictive: Write component → See video update → Realize it's 2 frames too fast → Adjust interpolation → See video update → Notice logo is too small → Adjust size → Repeat 191 times. Each iteration takes seconds, not minutes.
What really sets it apart is the mental model shift. Traditional video editing is destructive - you cut, you transform, you export. Remotion is declarative - you describe what frame 300 should look like, and it renders it. Every time. Perfectly.
This approach enabled something crucial for my SpecStory video: I could treat animations as data. The stats counter that increments from 90% to 99%? It's just interpolate(frame, [0, 60], [90, 99]). The logo that fades in? opacity: interpolate(frame, [30, 60], [0, 1]). When Claude Code suggested "make it count up from 90%," it was a one-line change.
Creating the Assets
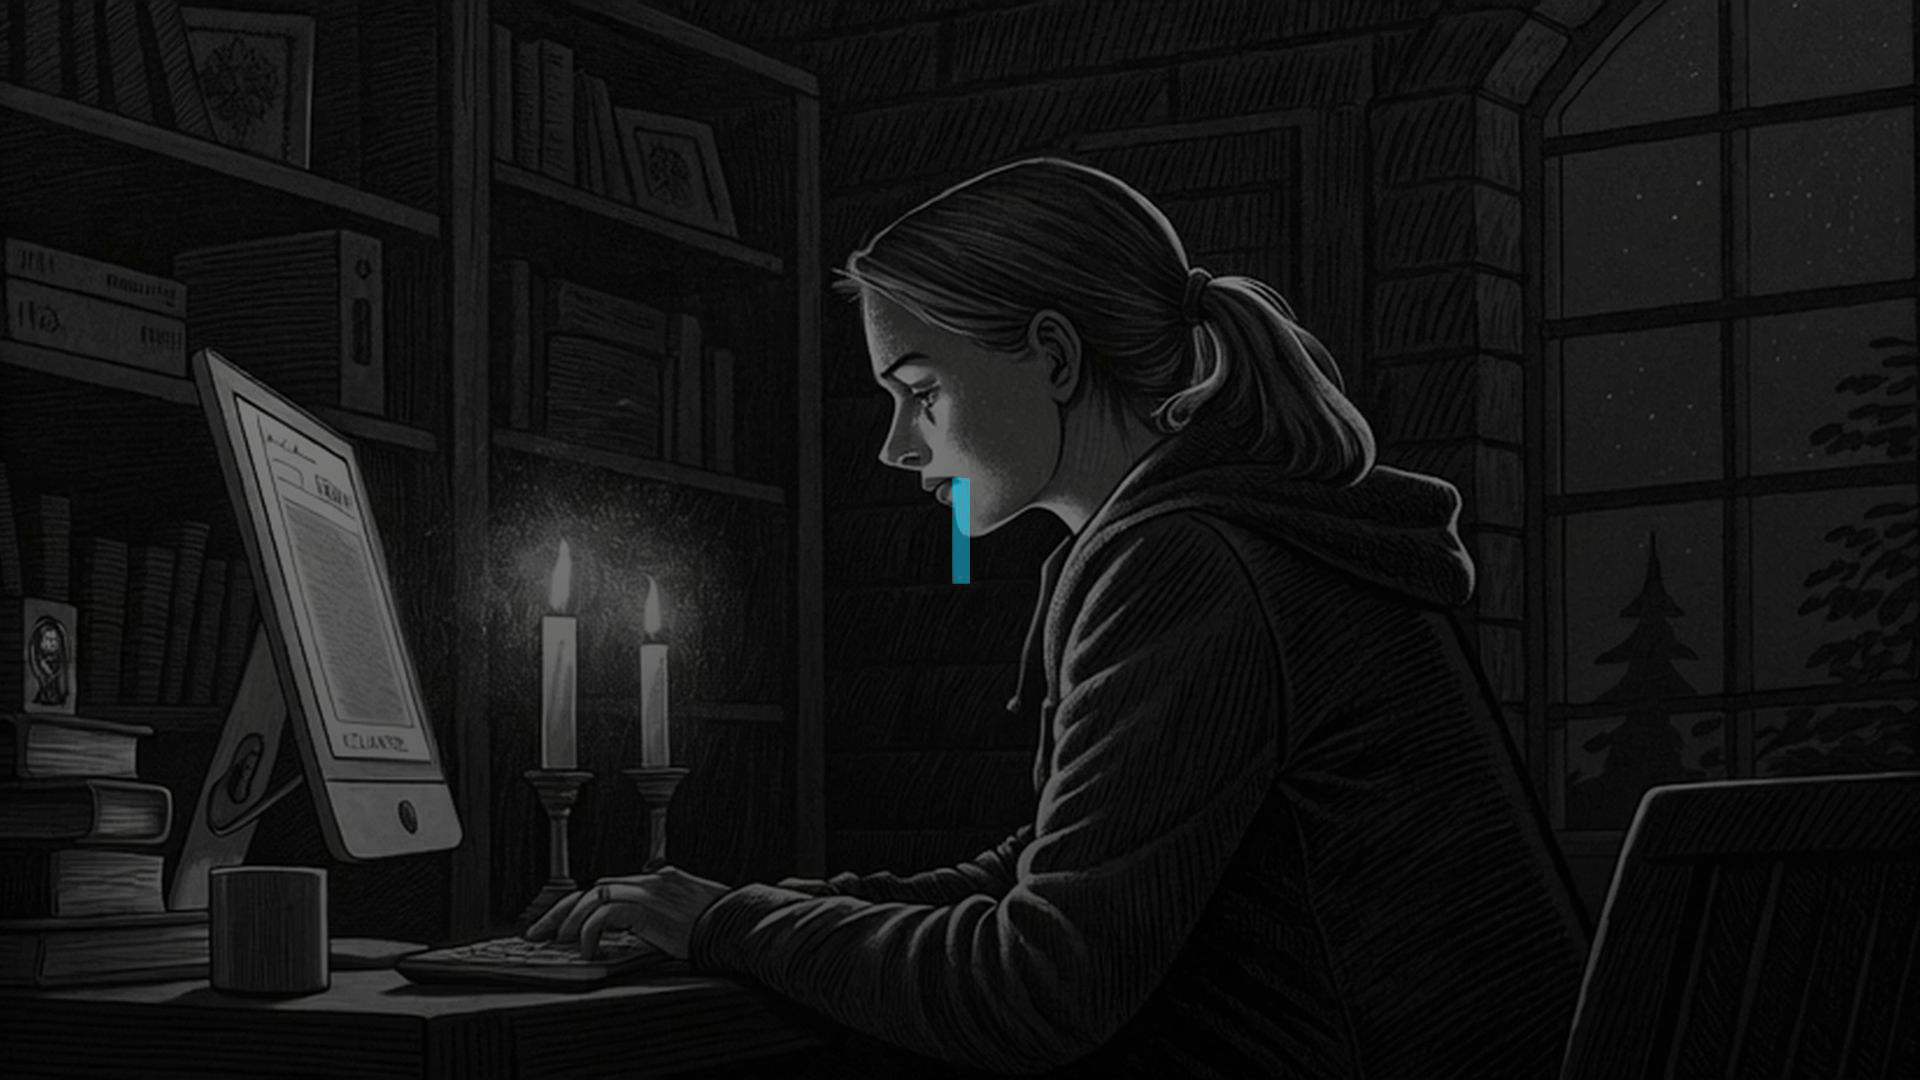
Before I could animate anything, I needed the raw materials. I figured out after initial trial and errors that it would be fun to make some of our website—specstory.com—come alive. I had previously created both the scribe and the woman using gamma.app. So I figured I'd give animating them a whirl!
The Medieval Scribe
The scribe didn't actually take that long to animate. You can see I used a simple prompt and after 2 generations I picked one that achieved the pan in the direction I thought made the most sense.

The Modern Developer
Getting a modern developer who didn't look like she time-traveled was harder than expected. The first attempts produced characters that looked distinctly out of place next to the VS Code interface. After switching to Midjourney's character reference feature, I finally got someone who looked like she belonged in 2025.

The Time Tunnel
The original plan called for "swirling time vortex effect morphing medieval to modern." After 15 minutes trying to code particle effects and bezier curves in Remotion, I realized I could use those failed attempts to create something better. I took my code experiments—the particle physics, the bezier curve calculations—and transformed them into a detailed prompt for Google Flow (Veo 3).
"Time Tunnel Effect - 20 concentric rings that move through 3D space, creating a tunnel/vortex effect. Rings alternate between medieval candleglow and modern monitor glow colors, scaling from small to large as they approach the viewer's POV. A perspective clock faces in the center with: Hour markers around the perimeter - Two rotating hands at different speeds (fast hand: 2 full rotations, slow hand: 1 rotation) - Glowing center dot - Medieval and modern colored hands. Light Streaks - 6 angled light beams radiating outward from the center, with gradient opacity creating a streaming effect. Flash Effect - A white radial flash at the midpoint (frames 28-36) for dramatic impact. Animation Sequence: Frames 0-15: Fade in from black - Frames 0-60: Tunnel rings continuously flow outward, clock hands rotate - Frames 28-36: White flash peaks at frame 32 - Frames 45-60: Fade out to black. The overall effect suggests traveling through time, with the clock as the focal point and the tunnel creating a sense of motion and transformation between eras."

My failed code attempts weren't wasted—they became the blueprint for exactly what I needed. Google Flow generated a perfect 4-second transition that would have taken hours to code.
Scene-by-Scene Breakdown
Let me walk you through what each scene actually does and the journey of building it:
Scene 1: VideoIntro (5 seconds)

// Text timing after multiple iterations:
// "We've always preserved our intent" - frames 15-90
// "What makes today any different?" - frames 90-150
// Logo at 600px width - frame 85 onward
Scene 2: TimeTransition (4 seconds)

<Video src={staticFile('time tunnel.mp4')} />.Scene 3: ModernDeveloper (7 seconds)

- Claude panel appears (5-15% progress)
- User prompt: "Build an app together"
- Accept button appears and gets clicked
- Code streams in at 40% progress
- SpecStory history appears at 75% progress
- Zoom effect highlights the .specstory folder
transform: `translate(-50%, -50%) scale(${interpolate(
  frame,
  [110, 170],
  [1, 1.8],
  {
    extrapolateLeft: 'clamp',
    extrapolateRight: 'clamp',
    easing: Easing.bezier(0.25, 0.1, 0.25, 1)
  }
)}) translateX(${interpolate(
  frame,
  [110, 170],
  [0, 400],
  { /* same options */ }
)}px)`Scene 4: IntentOverlay (5 seconds)
Scene 5: BenefitsAndLogos (18 seconds)

const stats = [
  { value: 100883, label: 'Installs', rate: 10 },
  { value: 4294574, label: 'Sessions saved', rate: 1 },
  { value: 175916, label: 'Rules generated', rate: 5 }
];

// Add randomness for dynamic counting effect
const randomOffset = Math.sin(frame * 0.3 + i * Math.PI) * 0.001;
const adjustedProgress = Math.min(1, frameProgress + randomOffset);

// Increment based on value magnitude
const incrementPerFrame = stat.value * 0.02 / 90 * stat.rate;
const displayValue = stat.value + Math.floor(frame * incrementPerFrame);npx remotion render src/index.tsx HeroVideo out/HeroVideo.mp4 \
--quality=100 \
--fps=30 \
--crf=16 \
--pixel-format=yuv444pNotable Challenges
Unlike character continuity issues like I detailed in The Open Window, when you're building programmatically there are different issues to work through. Personally, I'd take these any day compared to the stochastic nature of video gen for complex sequences (despite my burgeoning love for meta prompting).
1. Compilation Errors
Remotion's interpolation system is powerful but can be unforgiving: the fix is to switch from interpolating color strings to using conditional logic as I discovered.
// ❌ Wrong - This throws an error
background: interpolate(frame, [0, 60], ['#000000', '#ffffff'])

// ✅ Correct - Use conditional logic instead
background: frame > 60 ? '#ffffff' : '#000000'

// ✅ Or interpolate opacity
background: `rgba(255, 255, 255, ${interpolate(frame, [0, 60], [0, 1])})`
Other technical hurdles included React closing tag mismatches (multiple instances of `</AbsoluteFull>` instead of `</AbsoluteFill>`) and missing imports (Easing wasn't imported initially). The lesson: even AI needs to sweat the syntax details.
2. Visual Hierarchy Battles
"Make it bigger" became my mantra. The feedback was relentless: "Its all cut off and needs to LOOK MUCH BETTER and more modern and the logos should be prominent." One of my favorite moments - changing "why" to "WHY" in "Save the WHY behind AI codegen" - a single capitalization that transformed the message's impact.
3. Animation Timing Perfection
The zoom animation on the VS Code file explorer went through multiple iterations. Ultimately I realized that bezier curve easing (with Opus 4's help) and careful interpolation timing would do the trick. I described that as "zoom needed to be 'a little longer and not zoom back out.'" Here is the actual implementation:
transform: `translate(-50%, -50%) scale(${interpolate(
  frame,
  [110, 170],
  [1, 1.8],
  {
    extrapolateLeft: 'clamp',
    extrapolateRight: 'clamp',
    easing: Easing.bezier(0.25, 0.1, 0.25, 1)
  }
)}) translateX(${interpolate(
  frame,
  [110, 170],
  [0, 400],
  { /* same options */ }
)}px)`
The Bezier curve (0.25, 0.1, 0.25, 1) creates that smooth, professional feel. Extended from 30 to 60 frames after feedback that it was "choppy."
The Feedback Loop
191 pieces of feedback in 105 minutes. That's one adjustment every 33 seconds. The patterns that emerged tell me that 1) I have a lot of work to do to communicate visual intent better but 2) despite that, you actually can get a lot done with this type of phrasing!
What follows is an analysis of my SpecStory history. I thought it would be fun to "meta analyze" how and what I said to make this video come to life.
Most Frequent Feedback Types
| Category | Example Feedback | Frequency |
|---|---|---|
| Size Adjustments | "bigger logo", "make the link size bigger", "a little bigger" | 23 times |
| Timing/Speed | "the should count a little slower", "a bit faster", "longer zoom" | 18 times |
| Positioning | "closer up", "near the gutter", "at the top of the screen" | 15 times |
| Text Formatting | "WHY should be all caps", "on one line", "drop vertically not twist" | 12 times |
| Course Corrections | "sorry it should count up from 90%", "actually make it..." | 8 times |
The Conversational Arc
The Language of "A Little"
One moment captures the humanity in this process: "sorry it should count up from 90%". That "sorry" wasn't for Claude Code—it was me correcting my own thought mid-stream. The difference between 10% and 90% wasn't technical; it was psychological. Starting at 90% made the numbers feel established and growing, not struggling up from zero.
Remotion Patterns That Emerged
Through 191 iterations, certain patterns crystallized. These aren't just code snippets—they're the visual language that emerged from conversational development:
1. The Fade Pattern: Every Scene's Foundation
// The universal fade - used 30+ times across all scenes
const fadeIn = interpolate(frame, [0, 30], [0, 1], {
  extrapolateLeft: 'clamp',
  extrapolateRight: 'clamp'
});

// Complex multi-phase fade in BenefitsAndLogos.tsx
const benefitsOpacity = interpolate(
  frame,
  [BENEFITS_START, BENEFITS_START + 30, LOGOS_START - 30, LOGOS_START],
  [0, 1, 1, 0], // Fade in, hold, fade out
  { extrapolateLeft: 'clamp', extrapolateRight: 'clamp' }
);
2. The Spring Pattern: Making Things Feel Alive
// Text entrance with gravity (VideoIntro.tsx)
const firstTextSpring = spring({
  fps,
  frame: frame - 15,
  config: { damping: 100, stiffness: 200 }
});

// Logo stagger animation (BenefitsAndLogos.tsx)
logos.map((logo, i) => {
  const logoSpring = spring({
    fps,
    frame: frame - LOGOS_START - 20 - i * 10, // 10 frame stagger
    config: { damping: 100, stiffness: 200 } // Same config = cohesive feel
  });
});
3. The Bezier Zoom: Professional Polish
// The zoom that took 6 iterations to perfect (ModernDeveloper.tsx)
transform: `translate(-50%, -50%) scale(${interpolate(
  frame,
  [110, 170], // Extended from 30 to 60 frames after "choppy" feedback
  [1, 1.8],
  {
    extrapolateLeft: 'clamp',
    extrapolateRight: 'clamp',
    easing: Easing.bezier(0.25, 0.1, 0.25, 1) // The magic curve
  }
)}) translateX(${interpolate(
  frame,
  [110, 170],
  [0, 400], // Shift right to center the folder
  { /* same options */ }
)}px)`
4. The Streaming Text Pattern: Building Anticipation
// Text streaming with cursor (IntentOverlay.tsx)
const textToStream = "Intent is the new source code";
const charsToShow = Math.floor(interpolate(
  frame,
  [20, 80],
  [0, textToStream.length],
  { extrapolateLeft: 'clamp', extrapolateRight: 'clamp' }
));

// Organic blinking cursor
<span style={{
  opacity: Math.sin(frame * 0.3) * 0.5 + 0.5, // Sine wave for smooth pulse
  color: colors.modern.monitorGlow
}}>
  {charsToShow < textToStream.length ? '|' : ''}
</span>
5. The Stagger Pattern: Choreographed Sequences
// Benefits stagger (20 frame delays)
benefits.map((benefit, i) => {
  const benefitProgress = interpolate(
    frame,
    [40 + i * 20, 55 + i * 20], // Each benefit 20 frames after previous
    [0, 1],
    { extrapolateLeft: 'clamp', extrapolateRight: 'clamp' }
  );
});

// IDE code streaming (calculated delays)
const visibleLines = codeLines.filter((_, index) => {
  const lineDelay = index * 3; // 3 frames per line
  return frame > CODE_STREAM_START * duration + lineDelay;
});
6. The Phase Management Pattern: Complex Choreography
// Scene phase constants (BenefitsAndLogos.tsx)
const BENEFITS_START = 0;      // frames 0-210 (7 seconds)
const LOGOS_START = 210;       // frames 210-330 (4 seconds)
const CTA_START = 330;         // frames 330-540 (7 seconds)

// Clean phase transitions
const showBenefits = frame >= BENEFITS_START && frame < LOGOS_START;
const showLogos = frame >= LOGOS_START && frame < CTA_START;
const showCTA = frame >= CTA_START;
7. The Counter Pattern: Numbers That Feel Real
// The stats counter that took 10 iterations (BenefitsAndLogos.tsx)
const stats = [
  { value: 100883, label: 'Installs', rate: 10 },
  { value: 4294574, label: 'Sessions saved', rate: 1 },
  { value: 175916, label: 'Rules generated', rate: 5 }
];

// Start from 90% as per feedback
const startValue = Math.floor(stat.value * 0.9);
const incrementPerFrame = stat.value * 0.02 / 90 * stat.rate;

// Add organic randomness
const randomOffset = Math.sin(frame * 0.3 + i * Math.PI) * 0.001;
const displayValue = startValue + Math.floor(frame * incrementPerFrame);
These patterns didn't emerge from planning—they evolved through feedback. Each "make it bigger" and "a little slower" shaped not just individual animations but the entire visual language. The consistency across scenes? That's what 191 iterations of "MUCH BETTER" looks like in code.
Finishing in CapCut
Remotion outputs a video file. A very nice video file. But it's missing something - soul.
CapCut is where I added Paganini's Violin Concerto No.2 in B minor. Not AI-generated - sometimes you need the classics. The dramatic violin swells perfectly match the journey from medieval to modern. Added subtle fades between scenes, adjusted audio levels so the music doesn't overpower, exported at high quality.

The irony of using ByteDance's consumer video editor to polish a programmatically-generated video isn't lost on me. But CapCut just works. Drag in the video, drag in the audio, line them up, add a few fades, export. Done in 10 minutes.
The music choice mattered. I tried electronic tracks, ambient soundscapes, even generated some with Suno. Nothing worked. Then I remembered Paganini - virtuosic, classical, timeless. It bridged the medieval opening to the modern tech demo perfectly. Sometimes AI isn't the answer.
Reflections on Agentic Development
Building a video through conversation is different. With Remotion and Claude Code, I could:
- See changes instantly and not wait for rendering
- Version control the video like any other code
- Make precise adjustments with natural language
- Iterate faster than I could form complete thoughts
What worked:
- Natural language for incremental adjustments. "Make it bigger" is valid feedback when the system understands context.
- Spatial descriptions over pixel values. "Near the gutter" meant more than "left: 60px" until we figured out what near the gutter actually meant.
- Quick corrections mid-stream. That "sorry it should count up from 90%" moment showed how conversational development handles human indecision.
What didn't:
- Complex animations through words. The time vortex became an MP4 for a reason.
- Precise timing descriptions. "A little longer" could mean 2 frames or 20. Context helped, but not always.
- Color descriptions. Easier to just try different values than explain the exact shade of blue.
The surprising part? "Make it bigger" was legitimate feedback. In traditional development, you'd specify sizes upfront. Here, you discover the right size by seeing what's wrong with the current one. Those three attempts to get the logo size right weren't failures - they were the process working as intended.
What's Next?
This video took 2 hours and 191 pieces of feedback. The next one might take 1 hour and 100. Or maybe 4 hours and 400 if it's more complex. The point isn't efficiency - it's possibility.
Remotion keeps improving. Claude Code gets better at understanding visual intent. The tools will evolve. But the fundamental shift has already happened: we can now build videos the way we build websites - iteratively, programmatically, conversationally.
For anyone building products or creating content: try talking to your tools. You might be surprised by what emerges from the conversation.
Want to try it yourself?
The entire codebase is available, and Remotion has excellent documentation. Start with a simple animation, add an AI conversation partner, and see where 2 hours takes you. You might be surprised by what you can build when you stop coding and start conversing.
Embrace the "so dope" energy. Your commit messages don't need to be perfect—they just need to capture the momentum. When you're in flow with an AI partner, ride the wave. You can always clean up the git history later (but why would you want to?).